Battery switch on travel trailer function is crucial for managing your RV’s power. Understanding how these switches work—whether they’re simple on/off, or more complex systems—is key to preventing dead batteries and electrical issues. This guide will walk you through the different types, operation, troubleshooting, and maintenance, ensuring you’re ready to hit the road with confidence.
We’ll cover everything from basic wiring diagrams to advanced troubleshooting techniques, helping you confidently manage your travel trailer’s power. Learn to select the right switch for your needs, prevent common problems, and keep your electrical system running smoothly for years to come. This guide is designed to make you a travel trailer electrical expert!
Battery Switch Operation and Procedures
Properly using your travel trailer’s battery switch is crucial for extending battery life and preventing unexpected power outages. Understanding the switch’s operation and following safe procedures will ensure a smooth and enjoyable camping experience. This section details safe operation and best practices.
Operating a battery switch is straightforward, but incorrect usage can lead to problems. Always remember to disconnect the negative terminal first when working with batteries, and reconnect it last. This minimizes the risk of accidental short circuits.
Safe Battery Switch Operation
The following steps Artikel the safe and correct procedure for operating your battery switch. Remember to consult your specific switch’s instructions for any unique features or variations.
- Identify the Switch Positions: Most battery switches have clearly marked positions, such as “Off,” “Battery 1,” “Battery 2,” and sometimes “Both.” Familiarize yourself with these positions before operating the switch.
- Turn the Switch to “Off”: Before making any changes, always begin by turning the switch to the “Off” position. This completely disconnects the batteries from the trailer’s electrical system.
- Select the Desired Battery: Once “Off,” switch to the desired battery (“Battery 1” or “Battery 2”). This connects that specific battery to the trailer’s electrical system.
- Verify Power: After switching, check that the chosen battery is supplying power to your appliances. If not, double-check the switch position and battery connections.
- Switching Between Batteries: To switch between batteries, always return the switch to the “Off” position first before selecting the other battery. Never switch directly from one battery to another without going through the “Off” position.
Preventing Battery Drain
Understanding how to prevent battery drain is essential for maximizing the lifespan of your batteries and ensuring power when you need it. Neglecting this can lead to a dead battery and a frustrating camping trip.
- Regularly Check Battery Levels: Monitor your battery voltage regularly using a multimeter. Low voltage indicates a need for charging.
- Disconnect Unnecessary Appliances: When not in use, disconnect appliances and electronics to prevent parasitic drain. Even small devices can draw power over time.
- Use a Battery Disconnect Switch: A battery disconnect switch provides a quick and easy way to completely isolate your batteries from the trailer’s electrical system when not in use for extended periods. This prevents slow, unnoticed drain.
- Proper Charging: Ensure your batteries are properly charged using a suitable charger. Undercharging can lead to sulfation and reduced battery capacity.
Consequences of Improper Battery Switch Usage
Incorrect usage can result in several problems, ranging from minor inconveniences to significant damage. Understanding these consequences can help prevent issues.
- Dead Batteries: Leaving the switch in the wrong position can drain your batteries, leaving you without power.
- Damaged Appliances: Incorrect voltage or polarity can damage sensitive electronic devices.
- Electrical Fires: Improper connections or short circuits can potentially cause fires.
- Reduced Battery Lifespan: Consistent improper usage can shorten the life of your batteries.
Battery Switch Operation Flowchart
A visual representation can aid in understanding the correct procedure. The following describes a flowchart illustrating the proper steps.
The flowchart would start with a box labeled “Begin.” An arrow would lead to a diamond-shaped decision box asking, “Is the battery switch in the ‘Off’ position?” A “Yes” branch leads to a rectangle labeled “Select desired battery (Battery 1 or Battery 2).” A “No” branch leads back to a rectangle labeled “Turn switch to ‘Off’.” From the “Select desired battery” rectangle, an arrow leads to a rectangle labeled “Verify power.” Finally, an arrow from “Verify power” leads to a rectangle labeled “End.”
Battery Switch Maintenance and Safety
Keeping your travel trailer’s battery switch system in top condition is crucial for reliable power and preventing costly repairs. Regular maintenance ensures a longer lifespan for your battery switch and prevents potentially dangerous situations. This section Artikels a simple maintenance schedule and vital safety precautions.
Regular Maintenance Schedule
A proactive approach to battery switch maintenance will save you time and money in the long run. Aim for a semi-annual inspection and a more thorough maintenance check annually. This schedule helps identify and address minor issues before they escalate into major problems. During the semi-annual check, visually inspect the switch and connections for any obvious problems.
The annual check should include a more detailed inspection and cleaning.
Preventing Corrosion and Ensuring Longevity
Corrosion is the enemy of any electrical system, and your battery switch is no exception. Regular cleaning is key. Use a wire brush or sandpaper to remove any corrosion buildup from the terminals and switch housing. Apply a dielectric grease to the terminals after cleaning to prevent future corrosion. This grease creates a barrier that keeps moisture and contaminants away from the metal surfaces.
For particularly stubborn corrosion, a baking soda and water paste can help to neutralize the corrosive elements. Remember to always disconnect the battery before cleaning.
Safety Precautions When Working with Batteries and Electrical Systems
Working with batteries and electrical systems can be hazardous if safety precautions aren’t followed. Always wear safety glasses to protect your eyes from sparks or splashing acid. Use insulated tools to avoid electrical shocks. Ensure the battery switch is turned OFF and the batteries are disconnected before performing any maintenance. Never wear loose clothing or jewelry that could get caught in moving parts.
If you are unsure about any aspect of the process, consult a qualified electrician. Working with a friend can also be beneficial for safety and assistance. Proper ventilation is also essential, especially when working near batteries as they release hydrogen gas.
Battery Switch Inspection and Maintenance Checklist
Regular inspections are essential to prevent unexpected failures and ensure the safety of your electrical system. The following checklist provides a structured approach to your maintenance routine.
| Item | Inspection | Maintenance | Frequency |
|---|---|---|---|
| Battery Terminals | Check for corrosion, looseness, and damage. | Clean with wire brush, apply dielectric grease. | Semi-annually |
| Battery Switch Housing | Inspect for cracks, damage, or loose connections. | Tighten loose connections, replace damaged parts if necessary. | Annually |
| Switch Operation | Verify smooth and reliable operation in both ON and OFF positions. | Lubricate moving parts if necessary (consult manufacturer’s instructions). | Annually |
| Wiring Connections | Check for loose, damaged, or corroded wires. | Tighten connections, replace damaged wires. | Annually |
Battery Switch and Other Electrical Systems Integration
Your battery switch is the central nervous system of your travel trailer’s power, connecting and disconnecting various electrical components. Understanding its interaction with other systems is key to safe and efficient power management. This section details how the battery switch works with solar panels, converters, and other components, explores different battery configurations, and guides you through proper wiring and protection.
The battery switch acts as a master control, often switching power to and from your house batteries. When the switch is “on,” the batteries power your lights, appliances, and other 12V systems. This power flow is influenced by how other systems, such as your solar panels and converter, are wired into the circuit. A properly functioning switch ensures that power flows correctly and that sensitive components are protected from surges or overloads.
Multiple Battery Configurations
Connecting multiple batteries to your travel trailer offers increased power capacity and runtime. Common methods include parallel and series connections. Parallel connections connect batteries positive to positive and negative to negative, increasing amperage (capacity) while maintaining the same voltage. Series connections connect positive to negative, increasing voltage while maintaining the same amperage. The choice depends on your needs; parallel is better for increased runtime, while series is needed if your system requires a higher voltage.
For example, a typical 12V system might use two 6V batteries in series to achieve the necessary 12V, while a larger system might use four 6V batteries in a series-parallel configuration for both increased voltage and capacity.
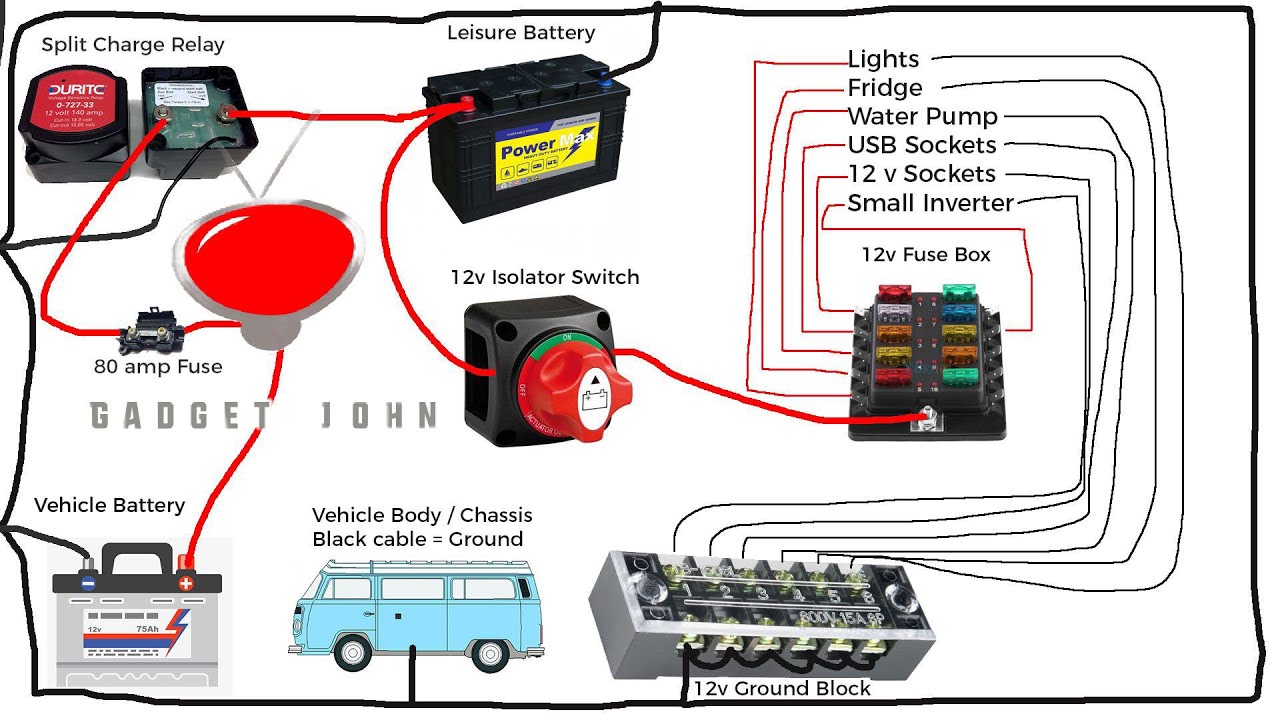
Wiring a Battery Switch
Wiring a battery switch correctly is crucial for safety and proper functionality. The switch should be connected to the positive (+) cables of your battery or batteries. The negative (-) cables should be connected directly to the load, bypassing the switch for safety reasons. This prevents the possibility of sparks at the switch if the negative cable is interrupted while the switch is on.
A properly wired system should include a main fuse or circuit breaker on the positive side of the battery, before the switch, to protect the entire system from overloads. The positive cables from the switch should then be connected to a fuse or circuit breaker panel that distributes power to the various circuits in your trailer. Never connect the negative cable through the switch.
A clear diagram from your switch manufacturer will show the proper connections. Improper wiring could lead to short circuits, fire hazards, or damage to electrical components.
Fuse and Circuit Breaker Protection
Fuses and circuit breakers are essential safety devices that protect your battery switch and other electrical components from overloads and short circuits. A fuse is a one-time device; once it blows, it needs to be replaced. Circuit breakers, on the other hand, can be reset after an overload. Your battery switch should be protected by a main fuse or circuit breaker, located near the battery.
Individual fuses or circuit breakers should protect each circuit in your trailer. For instance, a dedicated fuse might protect the lighting circuit, while another protects the water pump. This prevents a short in one circuit from taking down the entire system. Always use the correct amperage rating for your fuses and circuit breakers to match the electrical load of the protected circuit.
Using an undersized fuse or circuit breaker could lead to overheating and fire.
So, you’re an audiophile who travels? Awesome! Check out this guide on setting up your audiophile travel setup for amazing sound on the go. It’s crucial to protect your gear, and while you’re planning your trip, don’t forget travel insurance! Getting Aon travel insurance gives you peace of mind knowing your valuable equipment is covered.
Enjoy your travels and your tunes!
Selecting the Right Battery Switch for Your Travel Trailer: Battery Switch On Travel Trailer Function
Choosing the correct battery switch is crucial for the safe and reliable operation of your travel trailer’s electrical system. A poorly chosen switch can lead to insufficient power, overheating, or even fire hazards. This section will guide you through the key considerations for selecting the right battery switch for your needs.
So, you’re an audiophile who travels? Awesome! Check out this guide on setting up your audiophile travel setup for amazing sound on the go. It’s crucial to protect your gear, of course, so don’t forget travel insurance! Consider getting a quote from Aon travel insurance – peace of mind is priceless, especially when you’re carrying expensive equipment.
Proper insurance and a killer portable sound system? That’s the recipe for a truly amazing trip!
Amperage Rating and Number of Batteries
The amperage rating of your battery switch must be higher than the maximum current draw of your entire electrical system. Underestimating this can cause the switch to overheat and fail, potentially damaging your batteries or other components. You also need to consider the number of batteries you’re using. A single battery setup requires a different switch than a dual-battery system.
For instance, a travel trailer with a single 12V deep-cycle battery and modest electrical demands might only need a 100-amp switch, whereas a trailer with two 6V golf cart batteries powering a larger array of appliances might require a 200-amp or even higher capacity switch. Always check the amperage draw of your appliances and add a safety margin to determine the required switch amperage.
Battery Switch Model Comparison, Battery switch on travel trailer function
Several manufacturers offer a range of battery switches with varying features and specifications. Some switches offer simple on/off functionality, while others incorporate additional features such as battery isolation and charge control. For example, some switches provide separate circuits for house batteries and starting batteries, allowing you to disconnect the house bank without affecting the engine start. Other models include a built-in voltmeter for convenient battery monitoring.
Consider features such as ease of installation, durability, and the presence of any safety mechanisms like overcurrent protection.
Importance of Appropriate Amperage Capacity
Selecting a battery switch with the correct amperage capacity is paramount for safety and performance. A switch with an insufficient amperage rating will struggle to handle the current draw, leading to overheating and potential failure. This can cause damage to the switch itself, the wiring, and even your batteries. In contrast, a switch with a higher amperage rating than needed is generally acceptable; it will operate well within its capacity, providing a safety margin and ensuring reliable operation.
Always consult your travel trailer’s wiring diagram and the specifications of your appliances to determine the appropriate amperage rating. It’s always better to err on the side of caution and choose a switch with a slightly higher amperage rating than you calculate to be absolutely necessary.
Comparison of Battery Switch Brands and Models
| Brand | Model | Amperage Rating | Features |
|---|---|---|---|
| Blue Sea Systems | 7625 | 200A | Dual battery switch, LED indicators |
| Perko | 0544DP2 | 150A | Dual battery switch, heavy-duty construction |
| Ancor | 2001-2 | 100A | Single battery switch, simple design |
| Xantrex | Freedom Switch | Variable (depending on model) | Advanced features, digital display, remote control capability |
Visual Representation of Battery Switch Installation

A correctly installed battery switch in a travel trailer is a crucial element for safe and efficient power management. Understanding the visual aspects of the installation is key to ensuring proper functionality and preventing electrical hazards. This section will guide you through a detailed mental picture of a typical setup.Imagine a sturdy metal box, perhaps 6 inches by 4 inches by 3 inches, securely mounted to a wall inside your travel trailer’s storage compartment or a dedicated electrical bay.
This box houses the battery switch itself – a hefty device with clearly labeled terminals for your battery cables and the main power feed to your trailer’s electrical system.
Battery Switch Types and Physical Characteristics
Battery switches come in various forms. A common type is a heavy-duty rotary switch, resembling a large, robust light switch but with multiple positions. These often have a diameter of around 3-4 inches and are typically mounted using screws into a pre-drilled mounting plate. Another type is a more compact, rocker-style switch, similar to those found in automotive applications, but designed for higher amperage.
These tend to be smaller, roughly 2 inches by 1 inch, and may be surface-mounted or recessed. Regardless of type, the switch will be clearly marked with “ON,” “OFF,” and possibly intermediate positions for various battery configurations (e.g., battery 1 only, battery 2 only, both batteries).
Wiring Connections and Fuse Placement
Thick, heavy-gauge wires, likely red and black to denote positive and negative, connect to the battery switch. The red wire, representing the positive terminal of your battery(ies), will be connected to a large-capacity fuse, typically located very close to the positive battery terminal itself – this is a crucial safety feature. The fuse protects the entire system from overloads.
The other end of the fused positive cable connects to the appropriate terminal on the battery switch. The black (negative) wire connects directly from the battery’s negative terminal to a corresponding terminal on the switch. From the battery switch, additional heavy-gauge wiring will continue to the main distribution panel of your travel trailer. These wires should be neatly secured and protected from abrasion using appropriate cable ties and conduit.
Overall System Layout and Safety Considerations
The entire installation should be neat and organized. All wires should be routed strategically to avoid sharp bends, potential pinch points, and contact with moving parts. Proper labeling of wires and terminals is essential for troubleshooting and future maintenance. Remember, the entire system should be clearly visible for easy inspection and access. Adequate ventilation around the battery switch and fuse is also important to prevent overheating.
The battery switch itself, the fuses, and all wiring connections should be accessible but protected from accidental contact or damage. In some installations, a separate disconnect switch may be included near the batteries themselves for an additional layer of safety. This is separate from the main battery switch inside the trailer.
Mastering your travel trailer’s battery switch is about more than just flipping a switch; it’s about understanding your RV’s power system and keeping it healthy. By following the maintenance tips and troubleshooting steps Artikeld here, you’ll be prepared to handle any electrical challenge and enjoy worry-free adventures. So, get out there and explore!
FAQ Insights
What happens if I leave my battery switch in the “off” position?
All power to your house batteries will be completely cut off. This prevents battery drain, but also means no lights, appliances, or anything powered by the house batteries will work.
How often should I check my battery switch for corrosion?
At least once a year, or more frequently if you’re in a humid climate. Look for white powdery residue near the terminals.
Can I use a battery switch with solar panels?
Yes, but the wiring needs to be done correctly to ensure the solar panels still charge the batteries even when the switch is off. A properly installed system will typically bypass the switch for charging.
What size fuse should I use with my battery switch?
The correct fuse size depends on the amperage rating of your battery switch. Consult the switch’s documentation or a qualified electrician for the correct size.
